Showing posts with label Costumes for children. Show all posts

Wednesday, 6 June 2012

Diamond Jubilee Crowns


We have enjoyed watching some of the celebrations of the Queen's Diamond Jubilee on the tv over the long weekend. My boys are on holiday from school this week, but last week did lots of activities at school in the run-up to the big event.

* learning the National Anthem in class

* All week the school lunch menu was 'Jubilee' themed (British and Commonwealth meals)

* An afternoon tea party with scones and tea (fruit juice!)

* Making crowns at home to wear to the tea party...that's what I'll be sharing with you today.

They were so excited to make their crowns, bless them, but I have to admit that I did leave them to rather the last minute because I have been so tired just recently with pregnancy number 4 (22 weeks now - very exciting!).

I would have loved for them to have more of a part in the making process but they were still just as happy to tell me their designs and for me to make them while they slept. Plus...it was a lovely surprise for them to come down the next morning and find them!


When I set about making them, I did the usual thing of searching in the recycling box for materials ...only to find we had just one cereal box...eek! Well, that just added to the challenge - make three crowns in one evening, from one cereal box! Here's how I did it...

First I opened up the cereal box so it was flat then cut it into 3 equal strips (so I then had 3 long strips).

Then, while the boys were eating their dinner, I held a strip around each of their heads and stapled in place to create a snug fit (ha ha, that sounds like I stapled to their heads!! Be assured that I didn't). I tried to remember to have the flat side of the staple on the inside of the crowns to make sure the sharp side didn't scratch on their heads.

I then had three circlular bands of card, ready to become crowns.


This was the easiest and quickest to make. He wanted points and curves alternating all the way around. I started by doing points all the way around and then cutting every other point into a curve (or semi circle).

Daddy then took the crown to the end of the garden and sprayed it silver...I know, not the most environmentally friendly choice, but we had it in the house and, as always when making things, I try to use things we already have to hand and not buy anything extra if we don't need to.

Oh, I should also add that I made sure all 3 crowns had the coloured side of the cereal box on the inside and the plain side on the outside so that the paint would stick easier.
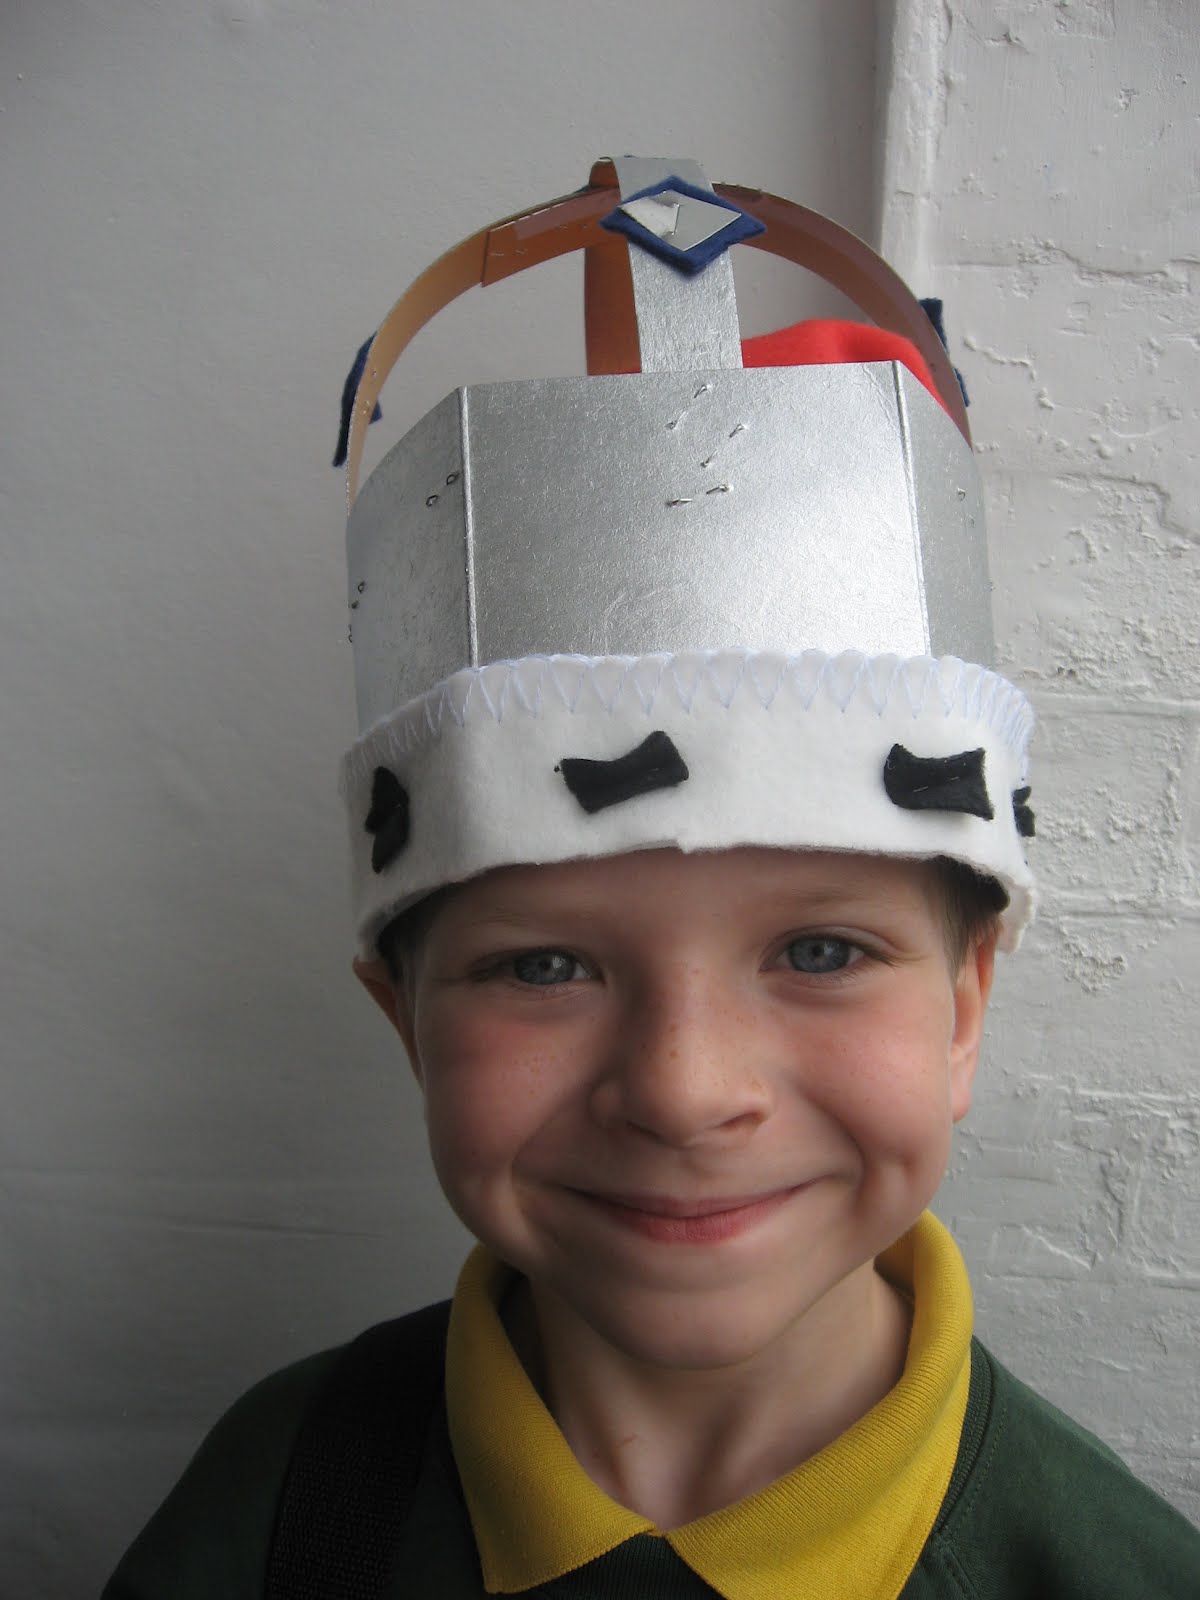


The other 2 crowns were made by keeping the original strip of card as it was and adding 2 thinner, long strips of cereal box card (which I salvaged from the flap off-cuts and stapled together). I just laid each strip over the crown to make it curve and then stapled each end to the crown base band and then stapled where they overlapped in the middle, to keep in place. These then got sprayed silver by Daddy too.


By the time all excitement of the silver spraying was done and the crowns were dry, it was off to bed for my three little Kings. The making fairy (aka a very tired Mummy) got to work at the finishing details.

I had been given some remnants of red, white and blue fleece blankets a while ago that someone had already used for a project, so these became the perfect choice to embelish the crowns. Also, as you may already know, I LOVE using fleece or felt to work with because it doesn't fray!

WHITE - I cut strips and used this as the fur edging, using little black rectangles of fleece too. This was stapled on.

RED - Quite tricky, but I cut larger sqaures of fleece and stapled them to the inside of the crowns.

BLUE - Small squares of fleece with some squares of silver card on the top, stapled on.

That's pretty much it!

1 cereal box + 3 enthusiastic and excited boys + 1 tired Mummy maker = 3 crowns to wear while munching on a Jubilee tea party!


What I used:

* 1 cereal box

* Silver spray paint

* Stapler and staples (LOTS!)

* Scissors

* Red, white, blue and black fleece

* Silver card (tin foil would have worked just as well)

How about making a crown from that cereal box you're about to recycle? After all, who says the Jubilee celebrations have to end already?!

Friday, 11 November 2011

Firework Costume ready to ZOOOM!

Well, the day for the costume wearing is here! I came down this morning to find all three boys sitting on the sofa, ready in their spotty costumes, excited to start the day.

Here, as promised, are photos!


My little firework with his teddy ready for the parade (he was a little shy and didn't want to do a 'zoom')!


You can see the 'fire' strands at the back here (though doesn't show it too well). They looked great streaming out behind him as he rode his scooter to school! They had frayed quite a bit but I think that can only add to the 'fireness' of them, don't you think?!


This was the biggest 'zoom' I got out of him this morning but I am very sure there will be lots of zooms, whizzes, bangs etc going on in the playground today! Proof of this will be his costume looking a bit worse for wear later, I am sure :-)

This is what the other boys looked like:


Spotty pjs and a spotty hat was the request here and he did so well making his own hat that I made a teeny tiny hat for his teddy as a surprise (all recycled card from food packaging).


Here is the spotty alien...


The hat is made in the same way as the firework hat but with a couple of pipe cleaners pushed into the top and the addition of googly eyes! He was very good at raiding the house to find things to use...I wonder who he has learned that from?! He found the alien hat in their toys and decided to put that under the green hat. The green cowl is actually an off cut from the trousers of the spotty dinosaur I made last year...yes, I am a hoarder of crafts!

I love that he had so many of the ideas himself, including two tails which I made with a scrap of green fleece blanket I had kept from a previous project. I just tied it onto his dressing gown belt and knotted them along their length to give a bit more texture.


So, off we trundled to school, ready to raise lots of money for Children in Need. Three great things about this project:

1 - The boys had fun designing, problem solving, searching, making...
2 - The school will raise lots of money for Children in Need today (each child pays some money for wearing a costume plus other activities)
3 - Our costumes were recycled, upcycled, refashioned so...Money spent on our 3 costumes? £0, so we can spend more on raising money!

Going Spotty for Children in Need Day!

Well...this is my first post! I have to admit that I have been putting it off for a while as the last couple of weeks have been busy. Today though, I knew I was going to be making my boys their Children in Need Day costumes and thought "why not take some photos along the way?!"

My boys school will be having a spotty hat competition and a spotty costume or spotty pjs parade...Cue Mummy! I always try to recycle things that I already have around the home. I hope you can get some ideas from what we have done.

Last year we had a spotty dinosaur made from fleece blankets, a spotty robot made from a cereal box and bits and bobs and a spotty dressing gown. This year we have a spotty firework, a spotty alien and spotty pjs and hat.

This is what we did for the firework:


My youngest wanted to design his hat first (it didn't start out as a firework, that idea came as we started to make). First I made a cone shape from a cereal box with the flaps cut off. We put the plain grey side on the outside so it could be easily painted later.


We secured it with sticky labels because we didn't have any masking tape (sticky tape can't be painted over). He then wanted to make it a 'marble run' hat...I tried, I really did, but...no. Then the firework idea was born. He is the firework and his hat is the pointy part (all his own idea). He painted it blue then, while we were waiting for it to dry I made the 'fire'! I wanted him to be able to zoom and wizz about the playground, so thought he could have 'fire' shooting from behind and from his wrists.


For the 'fire' I found an old orange net curtain, with a fire-like shine to it, and cut it into strips. I ended up using 6 shorter strips for the wrist bands and 6 longer strips for the waist band. For the wrists I found a scrap of red fleece from a previous project and cut it into a rectangle...


Onto this rectangle of red fleece, I added the orange strips with a simple knot...


Iused 3 for each wrist band. Then I just tied them onto his wrists with enough room for slipping off and on...


He LOVED the 'floatiness' of them and immediately started zooming his arms around! In the end I actually cut each orage strip into two, so there are more 'fire' strands. The longer strips of orange curtain were used in the same way for the waist band, which is a belt.


He had great fun decorating his firework hat. We used some firework pictures we had made last year (and found in the bottom of the craft box!). We got the idea from my friend here: http://www.theimaginationtree.com/2010/09/salad-spinner-art.html

He then added coloured pom poms as spots (I had wanted to upcycle some bottle tops but, alas, I realised I had cleared them out a week earlier...what was I thinking?!)


He will wear a blue jumper with sticky label spots (patiently made by Daddy). I will add a photo of the finished costume and child, in all his excitement, from the morning of the day!

I love making costumes for my boys. Yes, I get stressed when they all bombard me with questions and requests at the same time, but seeing the excitement on the day makes it all worth while! Thank you for reading and I hope it helps to show that costumes can be made easily and cheaply from things already found in the home.


Upcycled objects used:
-cereal box
-orange net curtain
-scrap of red fleece blanket
-bottle tops (if I had not thrown them out!)
-a salad spinner, repurposed to make paintings!